
How to get pushbullet notifications on fail2ban's ban actions and successful ssh logins
Goals of this post:
- Receive Pushbullet notifications
- whenever a fail2ban’s ban action is triggered
- whenever a user successfully logs into the server
- These notifications will also show geo location of the given ip addresses
0. Prerequisite
fail2ban and golang must be installed on your machine.
1. Get your access token and key
Visit pushbullet and ipstack to get your access token/key.
2. Intsall
A. Install pb-send
pb-send is a small application that sends messages through pushbullet.
$ go get -u github.com/meinside/pb-sendB. Install ip2loc
ip2loc fetches geo locations of given ip addresses.
$ go get -u github.com/meinside/ipstack-go/cmd/ip2loc3. Setup
Create config files for pb-send:
$ vi ~/.config/pb-send.json{
"access_token": "PUT_YOUR_PUSHBULLET_ACCESS_TOKEN_HERE"
}and ip2loc:
$ vi ~/.config/ip2loc.json{
"access_key": "PUT_YOUR_IPSTACK_ACCESS_KEY_HERE",
"is_premium": false
}Now you can test them with:
$ ip2loc 8.8.8.8
$ pb-send "test message"NOTE: fail2ban and PAM is run by root privilege,
so pb-send.json and ip2loc.json should also be placed in /root/.config/.
4. Configure fail2ban
Firstly, create notify-fail2ban.sh file that will be run by fail2ban:
Edit LOCATOR and SENDER paths to yours, and make it executable:
$ chmod +x /path/to/your/notify-fail2ban.shNow duplicate a fail2ban ban action:
$ cd /etc/fail2ban/action.d
$ sudo cp iptables-multiport.conf iptables-multiport-letmeknow.conf
$ sudo vi iptables-multiport-letmeknow.conf
then append a line at the end of actionban, which will execute notify-fail2ban.sh:
# Option:  actionban
# Notes.:  command executed when banning an IP. Take care that the
#          command is executed with Fail2Ban user rights.
# Tags:    See jail.conf(5) man page
# Values:  CMD
#
actionban = <iptables> -I f2b-<name> 1 -s <ip> -j <blocktype>
            /path/to/your/notify-fail2ban.sh <ip> <port>
(You should edit /path/to/your/ to yours.)
Now, create your custom jail.local file:
$ sudo vi /etc/fail2ban/jail.localwith following content:
[DEFAULT]

#
# MISCELLANEOUS OPTIONS
#

# "ignoreip" can be an IP address, a CIDR mask or a DNS host. Fail2ban will not
# ban a host which matches an address in this list. Several addresses can be
# defined using space (and/or comma) separator.
ignoreip = 127.0.0.1/8

# External command that will take an tagged arguments to ignore, e.g. <ip>,
# and return true if the IP is to be ignored. False otherwise.
#
# ignorecommand = /path/to/command <ip>
ignorecommand =

# "bantime" is the number of seconds that a host is banned.
bantime  = 36000

# A host is banned if it has generated "maxretry" during the last "findtime"
# seconds.
findtime  = 600

# "maxretry" is the number of failures before a host get banned.
maxretry = 3

# custom ban action
banaction = iptables-multiport-letmeknow
Finally, restart the fail2ban service:
$ sudo systemctl restart fail2ban5. Configure PAM
Create notify-ssh-login.sh file that will be run by PAM:
Again, edit LOCATOR and SENDER paths to yours, and make the file executable:
$ chmod +x /path/to/your/notify-ssh-login.shAfter that, open /etc/pam.d/sshd file:
$ sudo vi /etc/pam.d/sshdand append following lines at the end of it:
# for notifying successful logins
session optional pam_exec.so seteuid /path/to/this/notify-ssh-login.sh
(Of course, you should edit /path/to/this/ to yours.)
6. See it running
As long as all the things are setup correctly, you will receive notifications on each ssh login and fail2ban’s ban action:
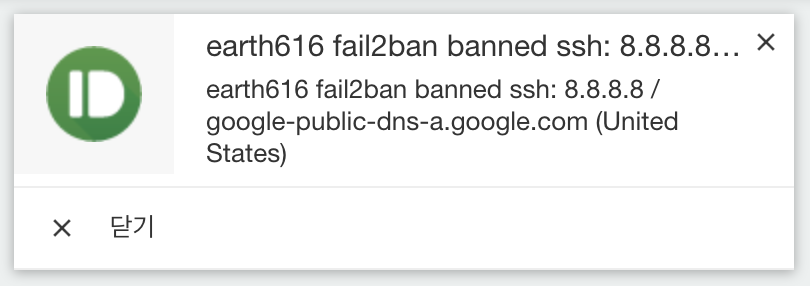
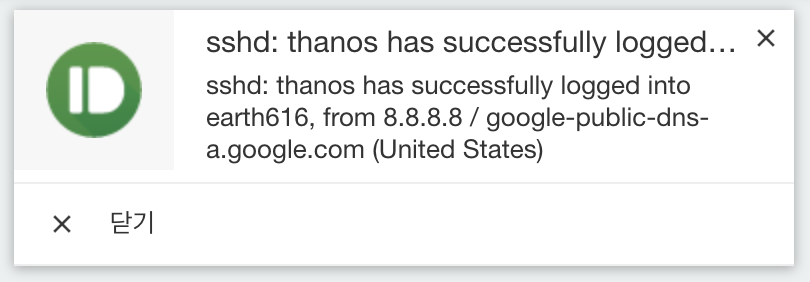
Now you can see when and where each login and ban action occurred in one place!